<action>: String parameter for the intended action (use exec for running recipes).
<subject>: String parameter specifying the JWT subject, typically the recipe to execute.
<expires_in>: Integer parameter for the token's validity in milliseconds.
<recipe_id>: (Optional) Unique ID of the recipe.
Example
Generate a JWT for a recipe execution with 1-hour validity by running the command in Omnitool chat window:
Output
The script outputs a JWT for use in API request headers.
Security Considerations
Ensure JWT security to prevent unauthorized recipe access.
Use secure connections for API interactions.
Rotate tokens regularly and prefer short expiration times.
Troubleshooting
If you encounter authorization issues, verify the JWT's expiration, correct header setup, and parameter accuracy.
With your JWT, make a POST request to the recipe execution API, including the JWT in the Authorization header.
Endpoint
Header
<token> is the JWT acquired from the /generateJwtToken script.
Curl Example
To make the request using curl, you would use the following command, replacing with your actual JWT:
Request Body
The args parameter acts as a input container for executing recipes, capable of passing various data types to the Chat Input as a starting block. These data types include images, text, audio, video, documents, and even structured JSON objects.
Response
Upon success, the API will initiate the specified recipe. You will receive a JSON response containing details about the recipe's execution status, including any outputs or errors.
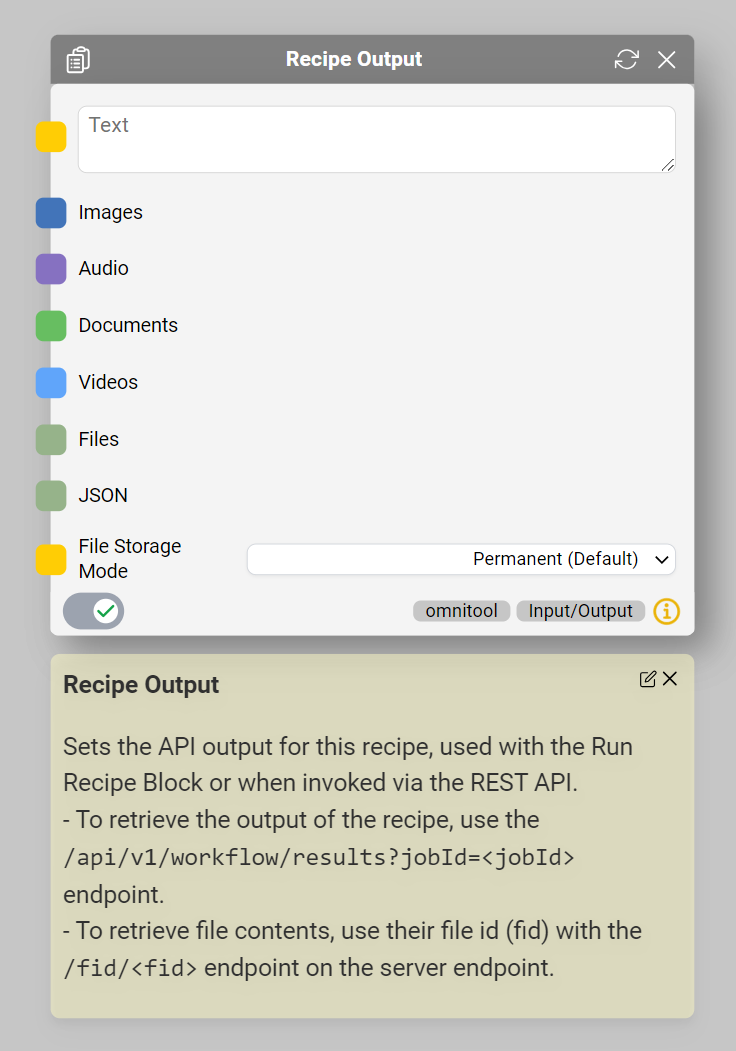
Ensure that your recipe includes the 'Recipe Output' block for proper execution and result retrieval.
Once a job is finished, retrieve results with:
Advanced
/generateJwtToken exec Workflow 3600000
POST http://127.0.0.1:1688/api/v1/workflow/exec
Authorization: Bearer <token>
curl -X POST http://127.0.0.1:1688/api/v1/workflow/exec -H "Authorization: Bearer <token>"
curl -X GET http://127.0.0.1:1688/api/v1/workflow/results?jobId=<job_id> -H "Authorization: Bearer <token>"
2. Executing a Recipe
Supported Image Formats
When using images in the args parameter, our system is compatible with various formats, such as GIF, PNG, JPG, and WebP. For APIs with specific format requirements, utilize Sharp's 'Prepare Image' block within your recipe to convert and comply with these constraints.
3. Retrieve the Recipe Results
Adding Recipe Output Block
Accessing Execution Outputs
Refer to examples/api.mjs for a end-to-end sample JavaScript implementation.
Generate JWT token through Chat
Chat Input block
Recipe Output block
Adding New Block via Extension
Extensions provide a powerful way to augment the capabilities of the system by exporting blocks to the block manager. These blocks are loaded on startup, enabling you to create custom components and patches. In this guide, we'll outline how to use extensions to create and export components.
Creating Components with the Composition API
Follow Creating Components with the Composition API , you can use the composition API from the mercs_rete library to create components. First, make sure to import the necessary modules:
import { OAIBaseComponent, WorkerContext, OmniComponentMacroTypes, Composer } from 'mercs_rete';
Then, you can create components and patches using methods provided by OAIBaseComponent.
Example:
let component = OAIBaseComponent
  .create(NS_ONMI, "redactPll")
  .fromScratch()
  .set('title', 'PII Redaction')
  .set('category', 'Compliance')
  .set('description', 'Redact Personal Information from text')
  .setMethod('X-CUSTOM')
  .setMeta({
    source: 'summary',
    summary: 'A PII redactor built using the solvvy/redact-pii library, implementing regex based PII reduction along with support for Google Cloud',
    links: {
      'What is PII?': 'https://www.cloudflare.com/learning/privacy/what-is-pii/',
      'redact-pii github': 'https://github.com/solvvy/redact-pii',
      'google cloud DLP': 'https://cloud.google.com/d1pr',
      'Solvy': 'https://www.solvvy.com/'
    }
  });
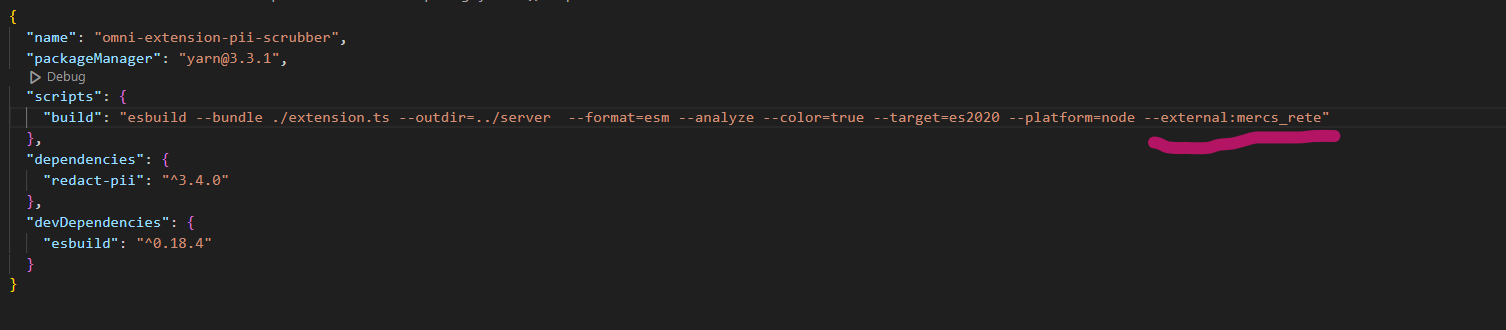
To prevent any errors from being thrown and to avoid bundling mercs_shared, which the server already has, you'll need to externalize mercs_rete. You can do this by adding --external:mercs_rete to the ESBuild in your package.json. This step ensures a smooth building process (because it already is loaded in server memory, no need to bundle it).
Add the supports: ["blocks:v2"] property to the extension.yaml to tell the server to try to load the blocks:
An extension must export an object containing hooks and a createComponents() function. Once you have defined your components and patches, combine them into an array and return them within the createComponents() function as described. The system will automatically load these during startup, incorporating them into the available set of components.
After making all the necessary updates to your extension code, run the following command to build the extension:
This command compiles your code and generates the extension.js file, which contains the entire extension ready for use. If you are using TypeScript for your extension development, make sure to update the tsconfig.json file with the appropriate configuration for your project.
By following these steps, you can create complex and customizable components and integrate them into the system via extensions. Make sure to follow the guidelines for each type of component or patch and consult the specific documentation related to each class or method for more details.
Use Local Models
Omnitool enables you to utilize models that run locally on your system. Follow this guide to begin integrating and using local models with Omnitool.
Supported Local APIs
For a detailed list of all the local apis supported by Omnitool, visit Omnitool Local API templates. Here is a quick list of supported software that allows to run models locally:
Make sure to install the necessary local software. Follow the instructions provided on their respective websites or GitHub repositories.
Verify Service Status:
Adding new Block via OpenAPI Spec
Importing an Existing OpenAPI Specification
Locate the API Specification: Determine if the API specification exists at a known URL. For example, OpenAI's specification can be found at https://raw.githubusercontent.com/openai/openai-openapi/master/openapi.yaml.
Validate the Specification: Use https://editor.swagger.io/ to validate the OpenAPI spec.
Add to System:
Navigate to packages/omni-server/extensions/omni-core-blocks/server/apis/[NAMESPACE]/[NAMESPACE].yaml.
Replace [NAMESPACE] with your desired namespace (e.g., openai).
Generate Draft Spec: If the specification doesn't exist, use tools like "OpenAPI Spec Generator" or request ChatGPT 4 to draft an initial spec.
Validate the Specification: Use https://editor.swagger.io/ to validate the OpenAPI spec.
Add to System:
We support the following authentication type:
If auth is not defined globally in the original OpenAPI spec, you can patch it in the API yaml /omni-core-blocks/server/apis/[NAMESPACE].yaml
type:
customSocket:
Base64 image socket option:
Array:
Allow multiple connect
how to patch when response doesn't have property?
When properties have mutually exclusive or dependencies
Property name is Case-sensitive
When request content type is multipart/form-data, need file type to carry mimetype
Add a New Block via Composition API
Import the necessary components
Instantiate the ComponentComposer and initialize your component by defining its namespace and operationId using the .create(displayNamespace, displayOperationId) method.
Set the namespace to const NS_OMNI
Further define the characteristics of your component using provided methods. You can set the title, description, method, and category.
Instead of using the fromScratch() method, you can also utilize the fromJSON() method with a valid Partial<OmniComponentFormat>
Create New Extension
Extensions allow adding additional functionality to omnitool, both on client and server side. They can provide a convenient way for prototyping AI powered applications.
⚠️ Extensions run with the same permissions as the omnitool process and have full access to the omnitool server process. They should be treated like any other npm package or executable code from the internet, with extreme caution. ⚠️
Creating a custom extension for Omnitool is streamlined with our easy-to-use template. Here's a step-by-step guide to create, develop, and test your extension:
Access and Use the Template Repository:
Update the api section as below.
Go to packages/omni-server/extensions/omni-core-blocks/server/apis/[NAMESPACE]/api/[NAMESPACE].yaml.
Replace [NAMESPACE] with your desired namespace (e.g., getimg).
Update the api section as below.
Example Configuration for OpenAI
Creating an OpenAPI Spec
Example Configuration for GetImg
Configure API in YAML
Patch Authentication
Filter APIs
Configure Blocks in YAML
Basic Metadata
Filter Inputs/Outputs
Transform
Hoist?
Control
Input
Socket Format Options
Rename
Run block to Generate Choices
Use JSONATA to Manipulate the format
Patch Security Scheme
Default Result
Special Cases
JSON. This must include both the
displayNamespace/operationID
and
apiNamespace/operationId
.
For inputs and outputs, you'll first create an IOComposer using the .createInput(name, type, customSocket) or .createOutput(name, type, customSocket) methods. You can further define their properties, including setting up controls which can be automatically selected or overridden.
Inputs always have controls associated with them, and they can be defined directly within the input creation process. Here's an example of defining an input with a control:
Note:
When using .allowMultiple() in conjunction with { array: true }, the input array is flattened into a single array:
You can define which characters are used for joining (or separating on input) an array (default is \n) via a custom setting (specific to the Text Socket):
Alternatively, you can also define inputs and outputs in an array:
You also have the option to directly write the JSON if that's your preference.
Controls are created using the ControlComposer and are added similarly to inputs/outputs.
Or
You can define the behavior of your component using a macro. In this case, the OmniComponentMacroTypes.EXEC macro type is used.
Finally, convert the component to JSON and export it.
Note: extensions don’t need to call addBlock. they just need to export the createComponent function.
To compose a patch with a valid OmniComponentPatch, the same format applies:
Use .dependsOn(string[]) to specify dependencies, indicating if a block relies on other blocks (for instance, when using runblock internally). For example:
Step 1: Import Necessary Components
Step 2: Create a New Component Instance
Step 3: Define Component Characteristics
Step 4: Create and Add Inputs and Outputs
Step 5: Create and Add Controls (Optional)
Step 6: Define Execution Macro
Step 8: Export the Component
Step 9: Add the Component to App Blocks
Optional Settings:
Composing Patches
Dependencies
Visit the Omni Extension Template on GitHub. This template provides the basic structure needed for your extension.
Create a new repository from this template, ensuring that it's set to public visibility.
Customize the extension.yaml File:
In your new repository, find and update the extension.yaml file.
Crucially, change the origin field to your repository’s clone URL.
Push Changes and Add Extension to Omnitool:
Commit and push your updated extension.yaml file to your GitHub repository.
In the Omnitool chat UI, type /extensions add [your GitHub repository clone URL, ending with .git] to add your extension.
Verify and Start Development:
Once added, locate your extension in omnitool/packages/omni-server/extensions/.
You’ll find a new folder named after your GitHub repository here.
Develop Your Extension:
Open the directory in Visual Studio Code or your preferred IDE.
This is your development environment where you can build and customize your extension.
Learn from Existing Extensions:
Explore other extensions in Omnitool for inspiration and understanding.
Observe their structure, functionality, and integration methods.
Iterate and Test:
Develop your extension iteratively, testing it regularly in the Omnitool environment.
Continuously refine based on test results and potentially user feedback.
Finalize and Share:
Once you’re satisfied with your extension, ensure it’s properly documented and shared with the Omnitool community.
Encourage feedback to further enhance your extension.
By following these steps, you can effectively create and develop a functional and innovative extension for Omnitool. This guide is designed to assist both beginners and experienced developers in navigating the extension development process with ease.
For an extension to be recoginized by the server, it needs, at minimum, an extension.yaml file in the directory.
The following directory structure may, optionally, exist under the extension's sub directory
public - Files in this directory are served to the client under server_url/extensions/<extension id>. By default, if client.addToWorkbench is true, the client will attempt to show public/index.html if it exists when a users selects the extension in the extension menu
scripts/client - Files in this directory, following the script format, will be exported to the client, adding to the list of known /chat commands. The chat command will be mapped to the file's name, so test.js would become /test. For more details, see Client Programming/Scripts below.
server/extension.js - This file is loaded by the server on startup and allows hooking extending server functionality. See Server Programming.
Currently the server keeps track of known extensions via the /etc/extensions/known_extensions.yaml file. An entry in this file will make extensions discoverable by the omnitool community. We plan on adding the ability to add additional extensions repositories outside the official one.
The file's format is straightforward:
An entry in this file is not required for an extension to be loaded, only for it to be discoverable by other omnitool users.
The client, after successful login, polls the /extensions endpoint on the server to retrieve a list active extension. It then constructs the extension menu and compiles the received client scripts.
Upon being shown, client extensions are loaded into an iframe overlaying the canvas by default and has access to the omnitool client context via the window.parent object. This is done by calling (window.parent.client.)workbench.showExtension(extension-id, openArgs ), usually from automatically from within the extensions menu or from a client script.
Closing the extension will show the canvas again but not unload the iframe. However, the extensions state is not guaranteed, as showing any other extension will replace the iframe content. If it is necessary to persist client state, local or session storage can be used or data could be marshalled via server scripts.
Scripts in the client/scripts subdirectory of the extension are automatically registered with each connecting client after successful authentication and become available as /chat commands.
Within scripts, full access to the omnitool client is accessbile via the window.client object.
To display the index.html file surfaced via the extensions public/ directory, the window.client.workbench.showExtension("extension-id", {...}); provides a convenient method that also allow marshalling 'opening args
When the workbench.showExtension command is used, the full object structure of the arguments object will be serialized (JSON. strigified) into a parameter q in the opening url.
The following example code shows how to deserialize the opening args inside the extension's index.html
When the server starts, it will execute the server/extension.js file for each extension, if present.
This file can:
(1) Attach hooks to server events to allow running code when these events happen (2) Export a list of blocks to be registered with the server.
A minimally viable extension.js looks like this
Event hooks are events exported by the server (see server/src/core/ServerExtensionsManager.ts) that extension can hook into. by default, these hooks are executed synchronously, giving the extension the ability to modify execution parameters or, in some cases, even cancel the execution.
Currently, the following events are implemented:
The first parameter of each event is an event context, followed by a variable list of parameter depending on the event.
For example:
Extensions can add blocks to the omnitool. Unlike API based blocks imported from the registry, extension components have the ability to execute javascript code, allowing them to encapsulate useful nodejs libraries or custom code to provide more sophisticated experiences
To export blocks from an extensions, a createComponents factory function must be exported by the extension.js file. This function is invoked by the server on startup with the servers block factory function (currently APIOperationsComponent.fromJSON).
category: Text-to-Speech
description: >-
  Text to Speech Synthesis using the ElevenLabs API, supporting a variety of
  monolingual (english) and multilingual voices.
meta:
  source:
    title: 'ElevenLabs: Text To Speech'
    links:
      Website: https://beta.elevenlabs.io/speech-synthesis
      Subscription: https://beta.elevenlabs.io/subscription
      API Reference: https://docs.elevenlabs.io/api-reference/quick-start/introduction
      Documentation: https://docs.elevenlabs.io/welcome/introduction
      Voice Lab: https://beta.elevenlabs.io/voice-lab
    summary: >-
      Text to Speech Synthesis using the ElevenLabs API, supporting a variety of
      monolingual (english) and multilingual voices.
title: Text To Speech
apiNamespace: elevenlabs
apiOperationId: Text_to_speech_v1_text_to_speech__voice_id__post
displayNamespace: elevenlabs
displayOperationId: simpletts
scripts:
  hideExcept:inputs:
    - prompt
    - temperature
    - model
    - top_p
    - seed
    - max_tokens
    - instruction
    - images
  hideExcept:outputs:
    - text
  model:
    type: string
    customSocket: text
    choices:
      block: getimg.listModels
      cache: global
      args:
        pipeline: face-fix
        family: enhancements
      map:
        title: name
        value: id
title: My First Extension                          # Human readable title, ideally under 20 characters
version: 0.0.1                                     # Semver compatible version string
description: A small omnitool extension doing stuff
author: omni@example.com                           # Author name or email
origin: https://github.com/user/repository.git     # url to the extensions git repository. This is not required for local extensions not published
client:
  addToWorkbench: false                            # if set to true, the extension will be added to the client's extension menu
dependencies:                                      # Optional field allowing auto installation of yarn packages required by an extensions in the same format as package.json. This is experimental and will likely change
  package: package@stable
packages:
known_extensions:
  - title: 3D Texture Playground                                #Human readable title
    id: omni-extension-texture-playground                       #Extension id
    url: https://raw.githubusercontent.com/user/repository/branchname/extension.yaml #discovery url for the raw extension.yaml file describing the extensions
    ...
function createScript()
{
  return {
    description: "Create a flipbook from the current chat",
    title: "Create Flipboard",
    exec(args){

      let images = [];
        // Find every image in chat
        window.client.chat.state.messages.forEach((msg) => {
          if (msg.attachments && msg.images && msg.images.length > 0) {
            images= images.concat(msg.images.map((img) => {
              return img.url
            }))
          }
        })
        window.client.workbench.showExtension("omni-extension-flipbook", {images: images});
        // One could also open the extension in a separate window:
        // window.open(`./extensions/omni-extension-flipbook/?images=${encodeURIComponent(JSON.stringify(images))}`, '_blank', 'popup=1,toolbar=0,location=0,menubar=0');
        window.client.sendSystemMessage(`Flipbook created, please check the extensions tab`, "text/markdown",
        {
          commands:
          [
            {
              title: 'Show Flipbook',
              id: 'toggleExtensions',
              args: []
            }
          ]
        });
        return true;
    }
  }
}
      const args = new URLSearchParams(location.search)
      const params = JSON.parse(args.get('q'))

      if (params.images) {
        images.value = params.images
      }
// ServerExtensionManager.ts
enum PERMITTED_EXTENSIONS_EVENTS
{
  'pre_request_execute'   = 'pre_request_execute',      // runs each time a block is preparing to execute it's underlying API call allowing manipulation of the outgoing call. Arg
  'post_request_execute'  = 'post_request_execute',     // runs each time a block has executed it's underlying API call, allowing manipulation of the result
  'component:x-input'     = 'component:x-input',        // runs each time a chat input block processes it's payload. Args:  (ctx, payload). Allows modification of payload
  'jobs.job_started'      = 'job_started',              // runs each time a workflow / job has started executing
  'jobs.job_finished'     = 'job_finished',             // runs each time a workflow / job has stopped executing
  'jobs.pre_workflow_start' = 'job_pre_start'           // runs each time a workflow is prepping execution, allowing it to be cancelled. Args: (workflow, workflow_context, ctx, actions). Set actions.cancel to true to abort execution, set actions.cancelReason to a string to return a specific cancellation reason to the user.
  'registry.package_installed': 'package_installed' //{ omniPackage:string, installationId, orgId, customBaseUrl, duration: (end - start).toFixed() })
}
const extensionHooks = {

  // An basic interceptor that replaces any chat input containing something like an email addresses with a simple replacement
  // This runs on any chat input
  'component:x-input': function(ctx, payload)
  {
    if (payload.text != null && typeof(payload.text) === 'string')
    {
      payload.text = payload.text.replace(\b[A-Za-z0-9._%+-]+@[A-Za-z0-9.-]+\.[A-Za-z]{2,}\b, "example@example.com")
    }
  },


  // Prevent any workflow from starting if the text input has the word clown
  // This runs every time a workflow starts
  'job_pre_start': function(ctx, workflow, workflow_context, actions)
  {
    console.log('job_pre_start pii scrubber', workflow_context.args)

    if (workflow_context.args ?? workflow_context.args.text?.includes("clown"))
    {
      actions.cancel = true
      actions.cancelReason = "N0 clowns allowed"
    }
  }
}
const MyCustomBlock =
 {
    schema:                                                   // <-- OpenAPI 3 Schema
    {
      // Namespace is automatically set to the extension id
      "tags": ['default'],
      "componentKey": "my-first-block",                       // <-- unique id within the namespace
      //"apiKey": "my-first-block",                           // <-- optional, set to the 'parent' API if this is a normal rest component (not supported yet)
      "operation": {
        // operationId is automatically set to componentKey
        "schema": {
          "title": "My First Block",                          // <-- componentn title
          "type": "object",
          required:[],
          "properties": {
            "text": {
              "title": "Some Text Input",
              "type": "string",                                // <-- openAPI type
              "x-type": "text",                                // <-- custom omnitool socket type if wanted
              "default": "my default value",
              "description": `My block description`
            }
          },
        },
        "responseTypes": {
          "200": {
            "schema": {
              "required": [
                "text"
              ],
              "type": "string",
              "properties": {
                "text": {
                  "title": "My Output Text",
                  "type": "string",
                },
              },
            },
            "contentType": "application/json"
          },
        },
        "method": "X-CUSTOM"                          // <-- This is important
      },
      patch:                                          // <-- optional omnitool patch block
      {
        "title": "My Custom Component",              /// <-- component
        "category": "Test",
        "summary": "Replaces Cars with Horses",
        "meta":
        {
          "source":
          {
            "summary": "Replaces cars with horses",
            links:
            {
              // list of string: string fields that are rendered as urls.
              "research papaer": "https://arxiv.org..."
            }
          }
        },
        inputs: {...},
        controls: {...}
        outputs: {...}
      }
    },
    functions: {
      _exec: async (payload, ctx) =>                           // <--  The _exec function is invoked when the component is run
      {
        if (payload.text)
        {
          payload.text = payload.text.replace("car", "horse" )
        }
        return payload                                       // <-- Do not forget to return the altered payload
      }
    }
  }

let blocks = [MyCustomBlock]

export default (FactoryFn: any) =>
{
  return components.map((c) => FactoryFn(c.schema, c.functions))
}
Ensure that the local software is active and running properly.
Select and Install Local API:
Navigate to the side menu and click the Local APIs button in the sidebar to view the local APIs supported by Omnitool.
Choose the desired Local API and install. Note: Install here refers to integrating the local service into blocks.
Locate Installed Blocks:
Once installed, you can find these blocks in the 'Add Blocks' section of top menu. For instance, here's how to find the block for Automatic1111.